Candle making trends are ever-evolving, incorporating new designs and techniques with time-tested approaches that are being revived. Although molded candles have been around for centuries, they are currently the latest trend in candles due to increased curiosity. Candlemakers are developing creative and exciting methods to update these traditional candles. These days, you can find practically anything on the market, ranging from body molds to bubble candles and everything in between.How to make a candle using a silicone mold?
Any candle created by pouring wax into a mold, letting it harden, and then taking it out of the mold before lighting is known as a molded candle. While creating a free-standing candle, you must consider three important factors: the wax, the mold, and the wick.
There are many excellent reasons to expand your collection of molded candles. Making jar candles does not allow you to grow your line into as many different shapes and sizes. Another reason you might want to think about creating molded candles is that jar prices have been rising while supply has been getting more challenging to obtain.
The initial cost of your mold (s), which can be rather expensive depending on the type, is a need for free-standing candles. On the other hand, if you purchase high-quality molds and maintain them correctly, you should be able to use that mold for many uses before replacing it.
In this article, we will examine how to begin making lovely free-standing candles. We will discuss the two most common types of molds and the varieties of wax that you can use. We will also discuss how to take the best possible care of your molds and how to make a mold candle.
What Wax to Use for Molded Candles?
You must choose a solid wax that can maintain its shape while burning because the walls of a container will not support a free-standing candle. Various waxes, such as paraffin, beeswax, palm, and soy wax, can make molded candles. Ensure the wax you choose has a minimum melting point of about 140°F.
Heat-resistant Harder waxes are more heat-resistant than container-grade, softer waxes. When creating a free-standing candle, there are a few reasons to refrain from using wax intended for a container. First, removing exceptionally delicate waxes from your mold, such as soy waxes and coconut wax, will be nearly impossible. Any fine details in the mold were likely retained during the unmolding process if you were fortunate enough to remove a candle manufactured with container wax from your mold. Lastly, whoever burns your candle must be ready to clean up a horrendous mess when it melts into a massive, greasy puddle if you could remove it entirely from the mold.
When you choose wax designed especially for mold candles and combine it with the suitable mold and wick, you can be sure that your candle will turn out wonderfully and maintain its shape until the very end.
How to Select the Right Mold?
After deciding which type of wax to use, you need to choose a mold. Here, we shall examine the two most widely used candle molds: silicone and metal.
Metal Molds
Metal molds are a fantastic choice to create simple, rounded-edge candles. Even with high-melting-point waxes, they maintain their strength and durability. Metal molds are more affordable than silicone and are highly durable if properly maintained. Certain antique metal candle molds have increased in value and are in high demand among collectors.
One drawback of metal molds is that they can only be used to create shaped candles devoid of intriguing embellishments. Another significant drawback is that the stickiness of the wax makes it challenging to remove the candles from the molds, making them unsuitable as molds for beeswax candles.
Silicone Molds
Silicone molds are great for crafting intricately detailed candles in many shapes. Because of their many benefits, many specialists utilize them when making candles.
Benefits of Using Silicone Molds
Silicone molds are virtually robust and may withstand years of professional candle-making use when manufactured with high-quality materials.
It can tolerate the pouring of wax that is hotter than 200°F.
Since silicone does not adhere to most waxes, mold release is unnecessary.
With silicone molds, candles may be created in almost any shape, with a nearlyinfinite features.
The primary drawback is their high initial cost, but after using them for a few years, users will find that the high price was justified. Additionally, you should confirm that the silicone mold you are buying has high tensile strength. Cheap silicone molds should be avoided since the low-tensile silicone used is prone to ripping and breaking, requiring replacement after very little use. Less expensive silicone molds will also retain aroma and color, transferring from one candle to another.
Choosing the Right Wick for a Mold Candle
The ideal wick for a free-standing candle can be chosen similarly to a container candle. To start, select a wick that is appropriate for the kind of wax you plan to use. You must know your candle’s diameter (width) to choose the proper wick size.
It is unlikely that a wick designed for a container candle can perform optimally in a free-standing candle with an identical diameter. This occurs because of the wax’s greater melting point and extreme hardness. A free-standing candle will need more heat to produce a melt pool the same size as that of a container candle with the same width.
Choosing the proper wick size for your mold candle will require utmost caution. The candle should burn gently and entirely inside of itself. Over wicking a candle will result in the melt pool expanding and leaking melted wax down the side of the candle due to the increased heat. If you under-wick the candle, the wax from the sides will melt down on top of the flame, putting it out, and the candle will tunnel down the middle and probably drown. As with other candles, it is crucial to test-burn your candle from beginning to end to ensure you have chosen the proper wick.
How to Make a Mold Candle
Now that you know what supplies you will need, let us look at how to construct a free-standing candle using both silicone and a metal mold. Remember that there are numerous approaches to creating a mold candle; we are just going to discuss our top choices for each kind of mold. It is critical that you discover the candle-making technique that suits you best.
What you’ll need:
- Wick
- Scissors
- Needle or knife, optional
- Tweezers, optional
- Silicone candle mold
- Bag of elastic bands (I used 8-10, but it depends on the size of your mold.)
- Wax (The amount required will depend on the mold you are using. I needed about 4 cups of soy wax for the dog mold.)
- Pour pot (or heat-safe metal measuring cup) for the wax
- Small pot, for boiling water
- Wooden chopstick, for stirring
- Tongs or well-fitting oven mitts, optional
- Clothespin
- Paint (I highly recommend using non-toxic, water-based acrylic paint. It’s the safest choice in candlemaking.)
- Paintbrush

How to do it:
Part 1 : Prepping the candle mould
1. Use scissors to cut a wick about 8 inches longer than your mold requires.
2. Thread the wick through the tiny hole at the top of the mold to ensure it is 4 inches long on both ends. If using your fingers to push the wick through is problematic, tweezers are a perfect solution. If there is not a hole at the top of the mold, you can gently make one using the point of a knife or a needle.
3. Place your mold flat on a table, upside down, so the opening faces upward.
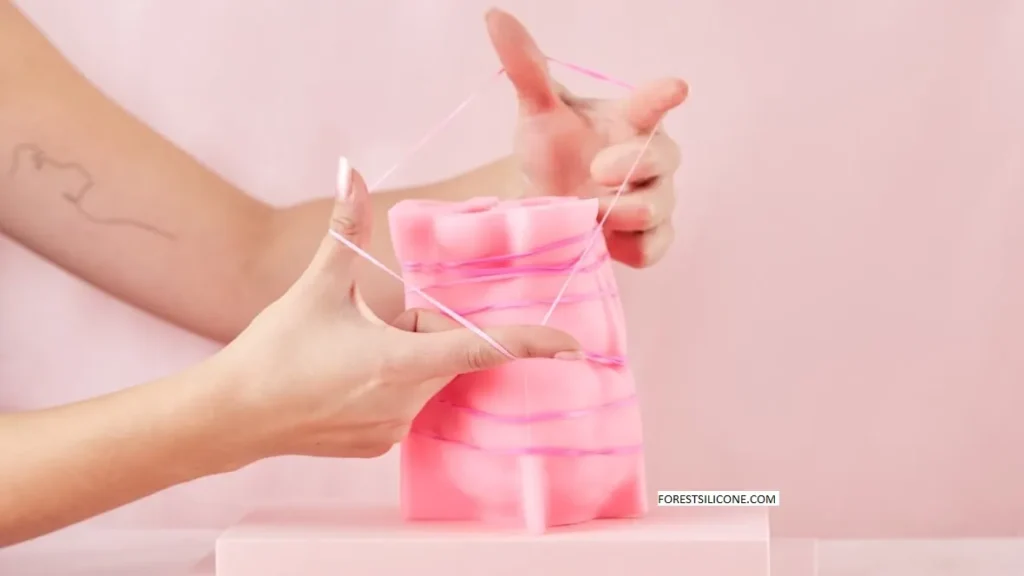
4. Wrap elastic bands around the mold to secure it tightly and keep it from opening when the hot wax is added. Set aside.
Part 2: Pouring and de-molding
1. Pour your un-melted wax into the pour pot (or heat-safe metal measuring cup).
2. Add water to a small pot until it’s about one-third full. Bring to a boil. Place the pour pot in the boiling water to melt the wax. Or, if you’re using a heat-safe metal measuring cup, place it directly on the burner. Wait 5–10 minutes or until the wax is liquefied/looks clear. You can gently stir with a wooden chopstick if needed. (Handles on pour pots and heat-safe metal measuring cups are generally safe for holding, but we recommend using tongs or well-fitting oven mitts.)
3. Turn the burner off and remove the pour pot or measuring cup. Place it on a heat-safe surface.

4. Carefully pour the hot wax into your mould until it reaches the edge of the mould.
5. Place a clothespin on the edge of the mold to centre the wick and hold it in place. (Each side of the clothespin will be held up by the edge of the mold.) See video.
6. Wait at least 10 hours for the candle to cure. It’s best to wait this long for a shaped candle with lots of detail to cure, no matter what type of wax you use. You want to make sure it’s firm before de-molding.
7. Once your candle has cured, slowly stretch out the edges of the mold, pulling it away from the candle. Push the bottom of the mold with your thumbs to help loosen the candle and gently unravel the mold until the candle separates. It’s very important to take your time with this process; it should take about 3-5 minutes, and the slower you stretch and unravel the mold, the better. You want to make sure the candle feels loose in the mold. If you’re struggling to remove your candle, put the mold (with candle) in the freezer for about 45 minutes, and as soon as you take it out, try the process again.

8. Once you have the candle out of the mold, use scissors to trim the wick. Cut the top so it’s about an inch long, then cut the bottom right at the end of the candle.
9. Lastly, you can decorate your candle to make it unique. I added a cute little pink nose using a small paintbrush and acrylic paint. Play around with adding details! If you have another type of candle mold with a unique shape, adding small rocks or colourful rhinestones can add to the look of your candle.
Note: Decorative items such as dried flowers, wood, herbs, stones or gemstones in very small amounts are safe to add to your candle but should never be added in large amounts that go over the wick. Using any of these in large quantities, or adding glitter or mica powder to the top of the candle, will not allow the wick to burn properly and could potentially be unsafe. Glitter and mica powder may cause the flame to extinguish on its own, causing the candle not to burn properly.

10. Now you’ve made the cutest dog candle from scratch! Adorable candles like this one can be hard to burn, but you can definitely light them! I recommend waiting 3 days before burning to ensure the candle is completely cured.

Conclusion
Learning to make free-standing molded candles is a lot of fun when it comes to expanding your candle-making experience. It will let you add intriguing new shapes you might have yet to achieve with container candles. Although they can be a little more challenging to make, and the molds can be a little pricey, the benefits will far outweigh the difficulties once you get started. A good mold should be purchased from forestsilicone so you can use it for many years. Happy Candle Making!